Arianet Cloud
Arianet Cloud (Cloud Computing) provides hourly cloud servers with private networks, floating and elastic IPs, separate volumes, firewalls, snapshots and load balancers. You pay only for the hours a resource exists, and each month counts as 730 hours.
Overview
Cloud server / Cloud Computing → Overview («سرور ابری / Cloud Computing ← نمای کلی») summarizes your cloud account: the number of servers (running and stopped), volumes and firewalls, the estimated cost per month and per hour, shortcuts for creating a server, volume and firewall, your servers and recent activity, and the active data centers.
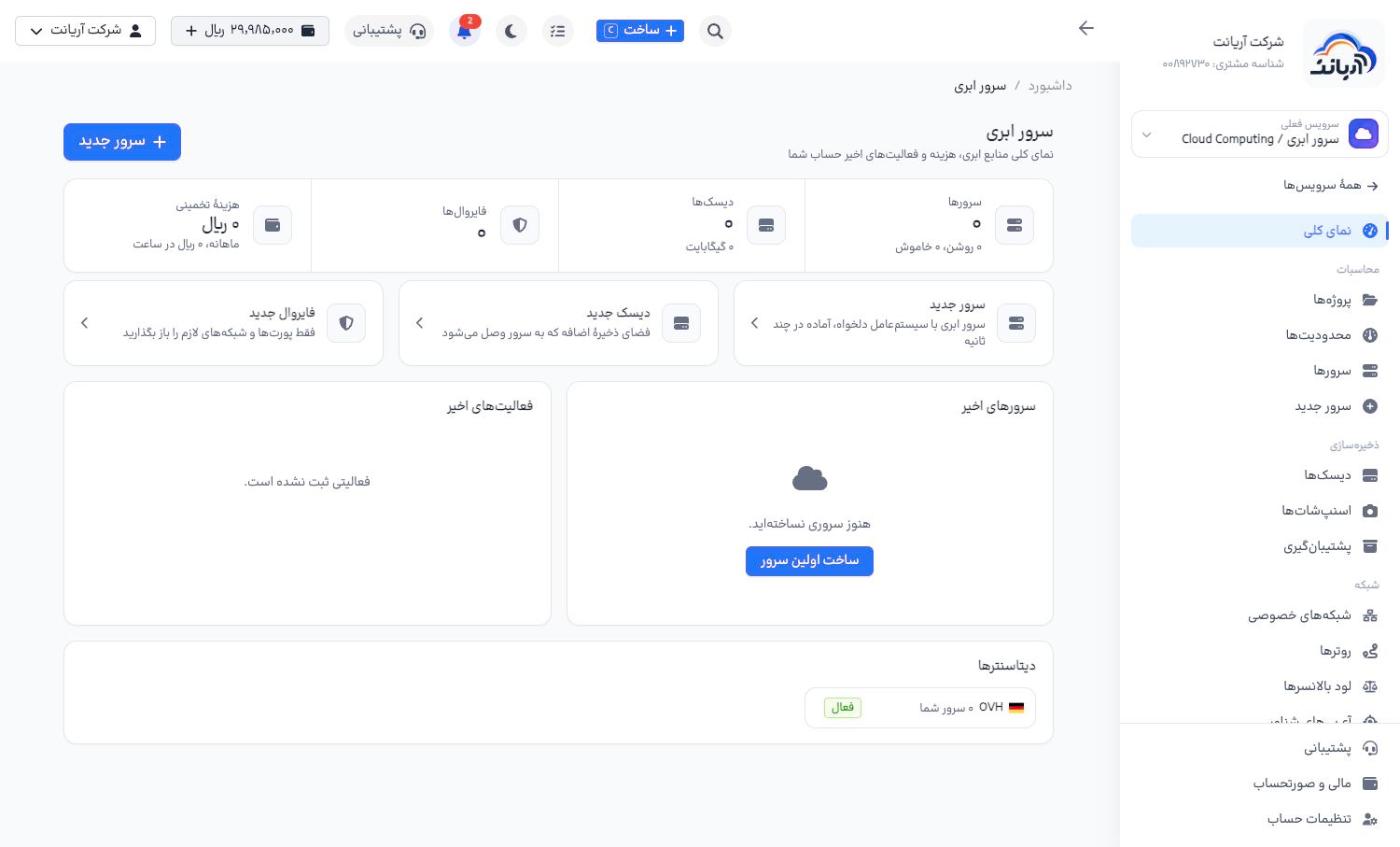
The cloud sidebar has four sections:
- Compute («محاسبات»): Projects, Limits, Servers, New server
- Storage («ذخیرهسازی»): Volumes, Snapshots, Backups
- Networking («شبکه»): Private networks, Routers, Load balancers, Floating and elastic IPs
- Security («امنیت»): Firewalls
The Create («ساخت») button in the top bar (keyboard shortcut C) opens, from any cloud page, a menu for creating a server, volume, private network, firewall, floating IP, load balancer or snapshot.
Creating a cloud server
Click New server («سرور جدید»). The page has eight numbered sections, and the Order summary («خلاصه سفارش») box at the side shows all your choices and the cost of each part, the hourly cost and the approximate monthly cost.
1. Region and 2. Operating system
Choose a region. Each region's card lists its features (IPv4, IPv6, private network, floating IP, elastic IP, NAT and so on). Then choose an operating system and its version. There are also Applications («اپلیکیشنها»), My snapshots («اسنپشاتهای من») and Backups («پشتیبانها») tabs, which means you can create a new server from another server's snapshot or backup.

3. Plan
Choose a plan from the Standard («استاندارد»), Compute-optimized («پردازشی») or High memory («رم بالا») group. Each plan lists its CPU, RAM, disk, traffic, and hourly and monthly price. The hourly cost is deducted from your wallet, and the monthly price is the cap on the cost.
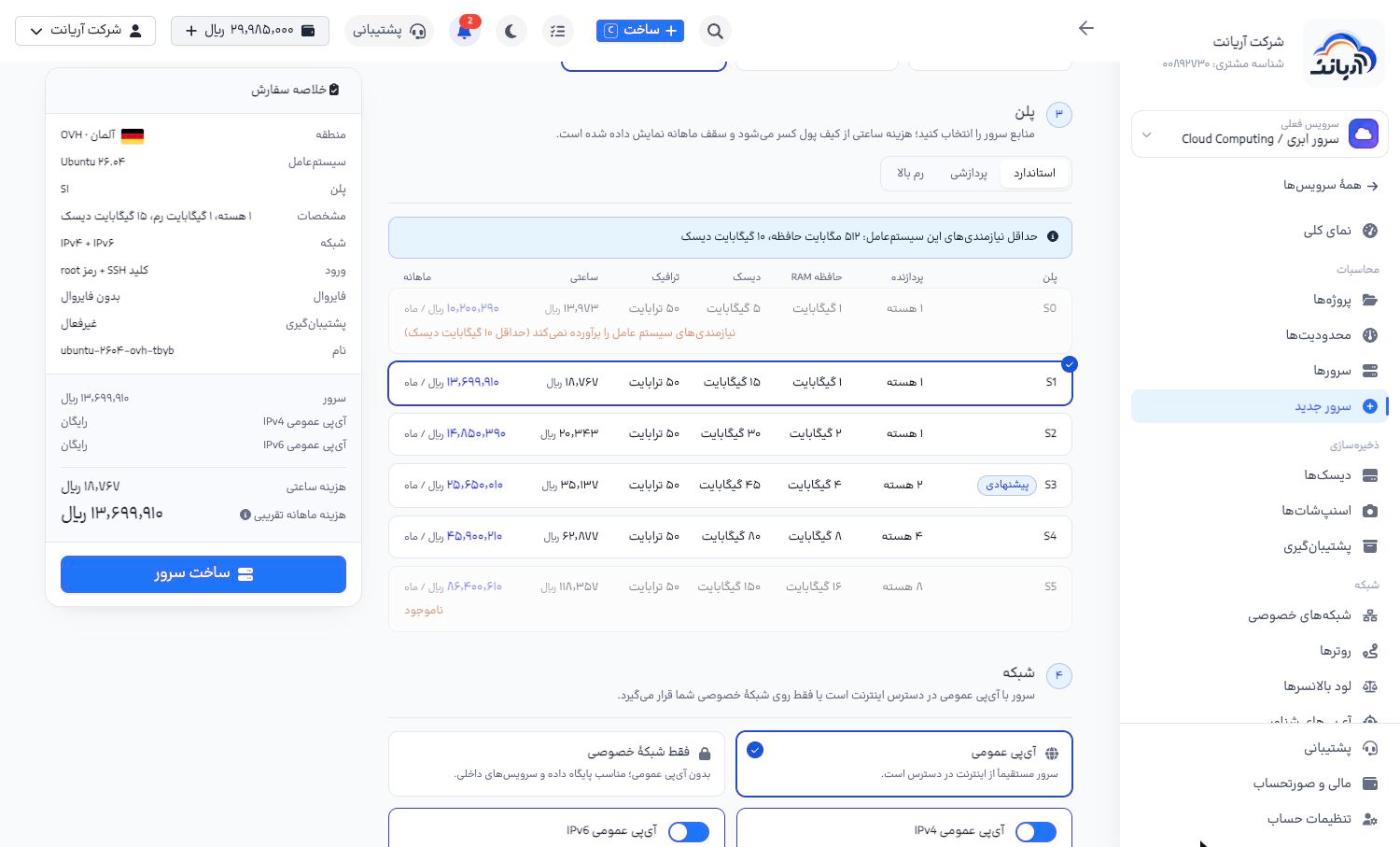
The minimum requirements of the chosen operating system (for example 512 MB RAM and 10 GB disk) are shown above the table. Plans that do not meet this minimum are disabled.
4. Networking and 5. Firewall
- Public IP («آیپی عمومی»): the server is reachable directly from the internet. Turn public IPv4 and IPv6 on or off separately (both are free).
- Private network only («فقط شبکهٔ خصوصی»): no public IP; suitable for databases and internal services.
- Private networks (optional) («شبکههای خصوصی (اختیاری)»): servers on the same private network connect to each other over internal IPs, with no traffic cost.
- Firewall («فایروال»): choose an existing firewall or create one with Create firewall («ساخت فایروال»).
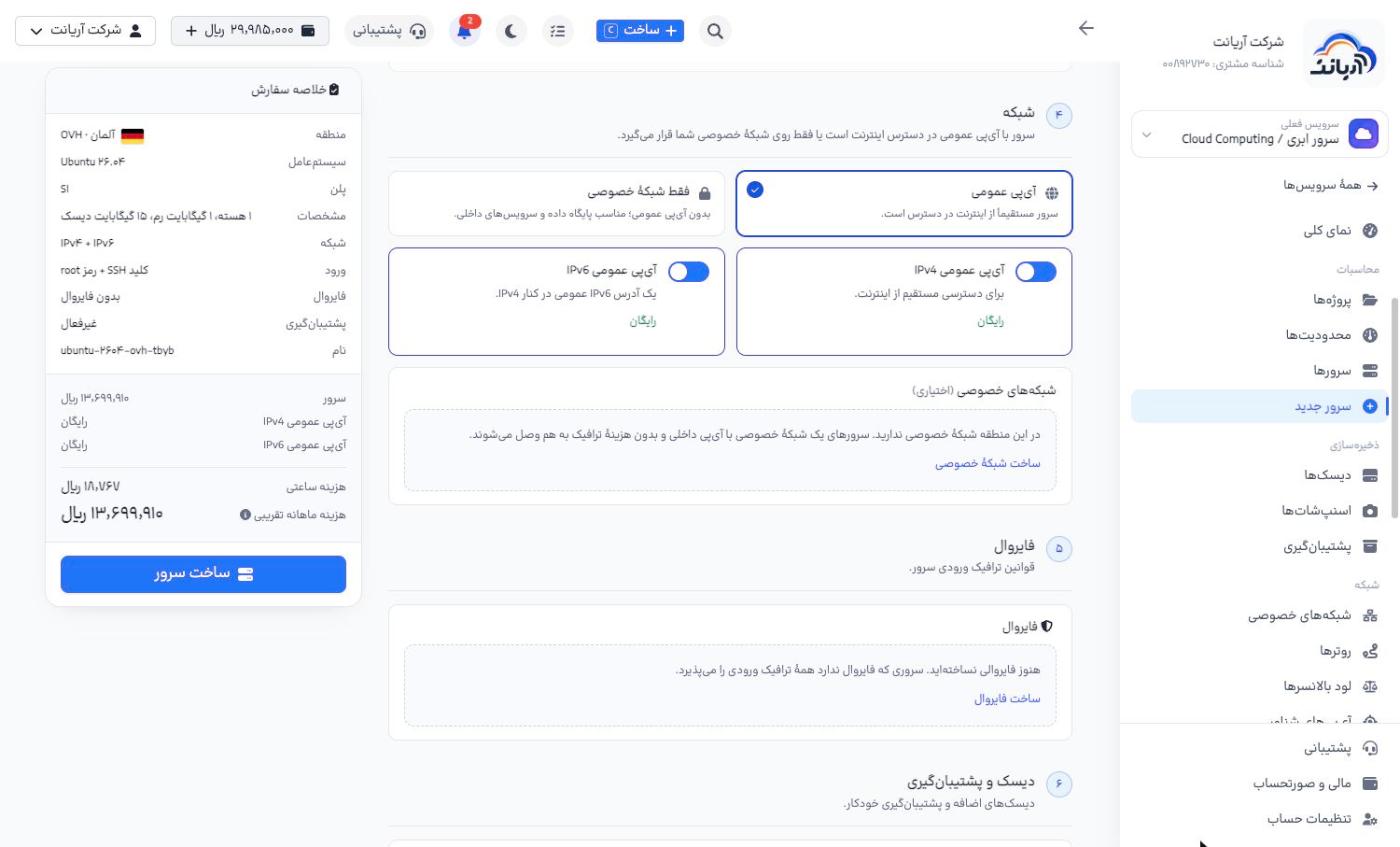
A server with no firewall accepts all incoming traffic. Always put a firewall on public servers and open only the ports you need.
6. Volumes and backups and 7. Login method
- Additional volumes («دیسکهای اضافه»): the main disk comes with the plan. You can choose separate volumes in the same region to be attached once the server is running; they are charged separately.
- Automatic backups («پشتیبانگیری خودکار»): a full copy of the server's disk is taken every day and the last few copies are kept. Cost: 20% of the plan cost.
- Login method («روش ورود»): SSH key («کلید SSH»: your saved keys, Add new key «افزودن کلید جدید», or a One-time key «کلید یکبارمصرف» for this server only) or Password («رمز عبور»).
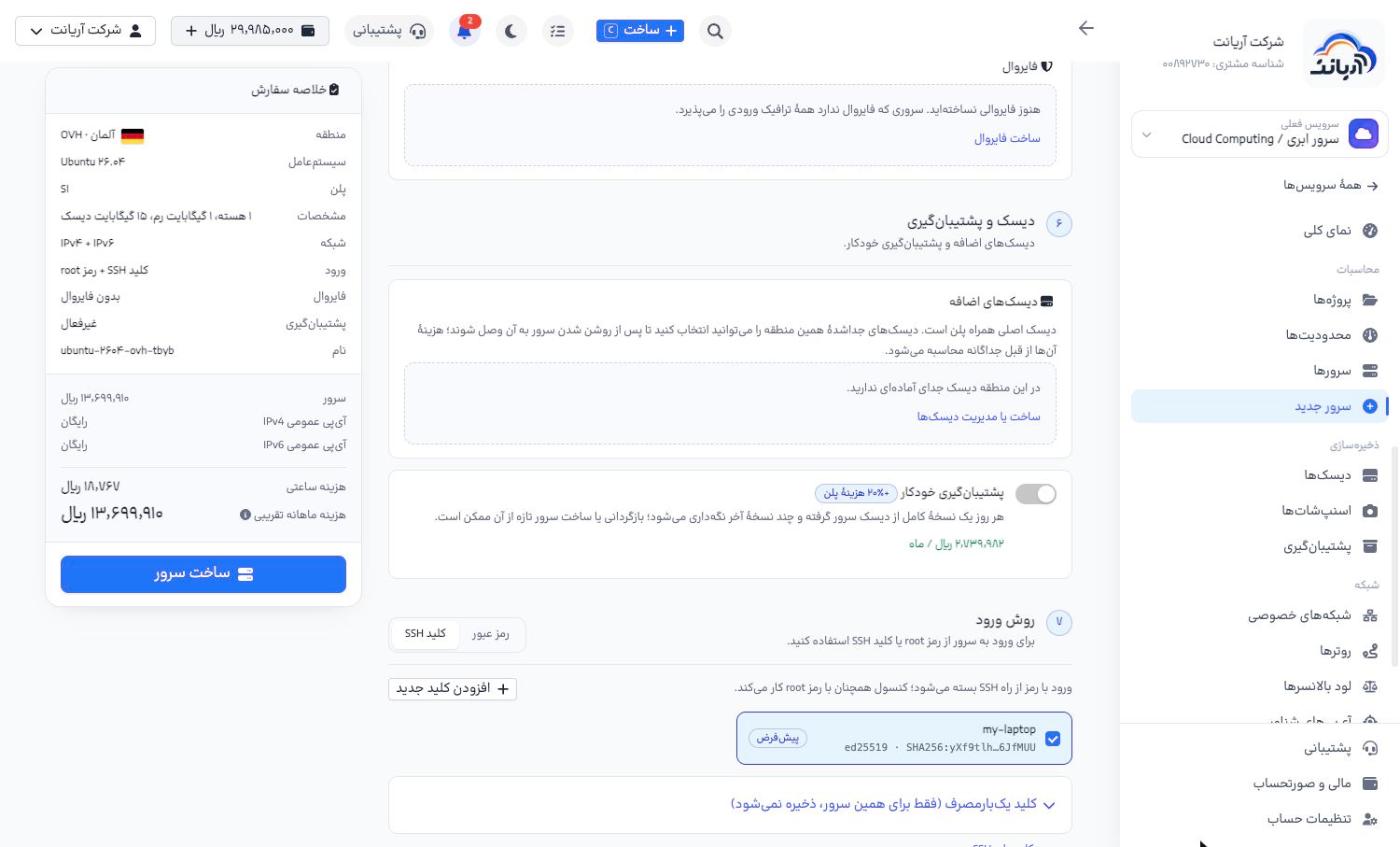
With an SSH key, password login over SSH is disabled, but the console still works with the root password.
8. Name and advanced settings
- Project («پروژه»): the new resource is created in this project and its cost is attributed to it.
- Server name (hostname) («نام سرور»): English letters, digits, dots and hyphens; up to 63 characters. Use the button next to it to generate a random name.
- Number of servers («تعداد سرور»): create several identical servers at once.
- Labels (optional) («برچسبها (اختیاری)»): key/value pairs such as
env=prod, for grouping and search. - Startup script (cloud-init) («اسکریپت راهاندازی»): runs on first boot; for example to install packages or create a user.
- Power on after creation («روشن شدن پس از ساخت»)
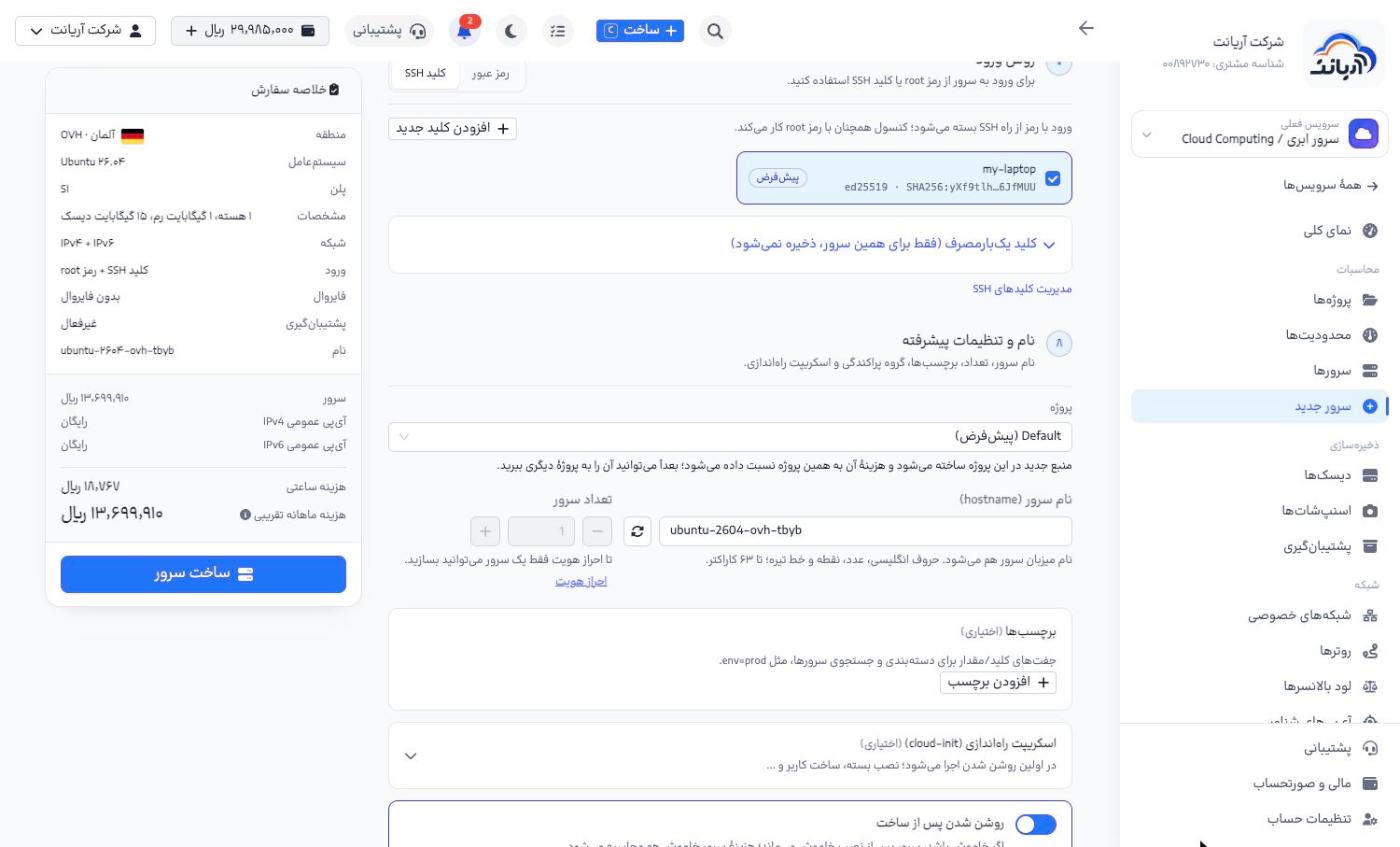
Until you complete identity verification, you can create only one server.
Create
Click Create server («ساخت سرور»). The creation page shows the steps live: request submitted, preparing network and firewall, creating the virtual machine, booting the operating system, attaching IPs and volumes, and ready. The Event log («گزارش رویدادها») also records the details of each step. Creation usually takes less than a minute, and you are charged only once the server is ready.
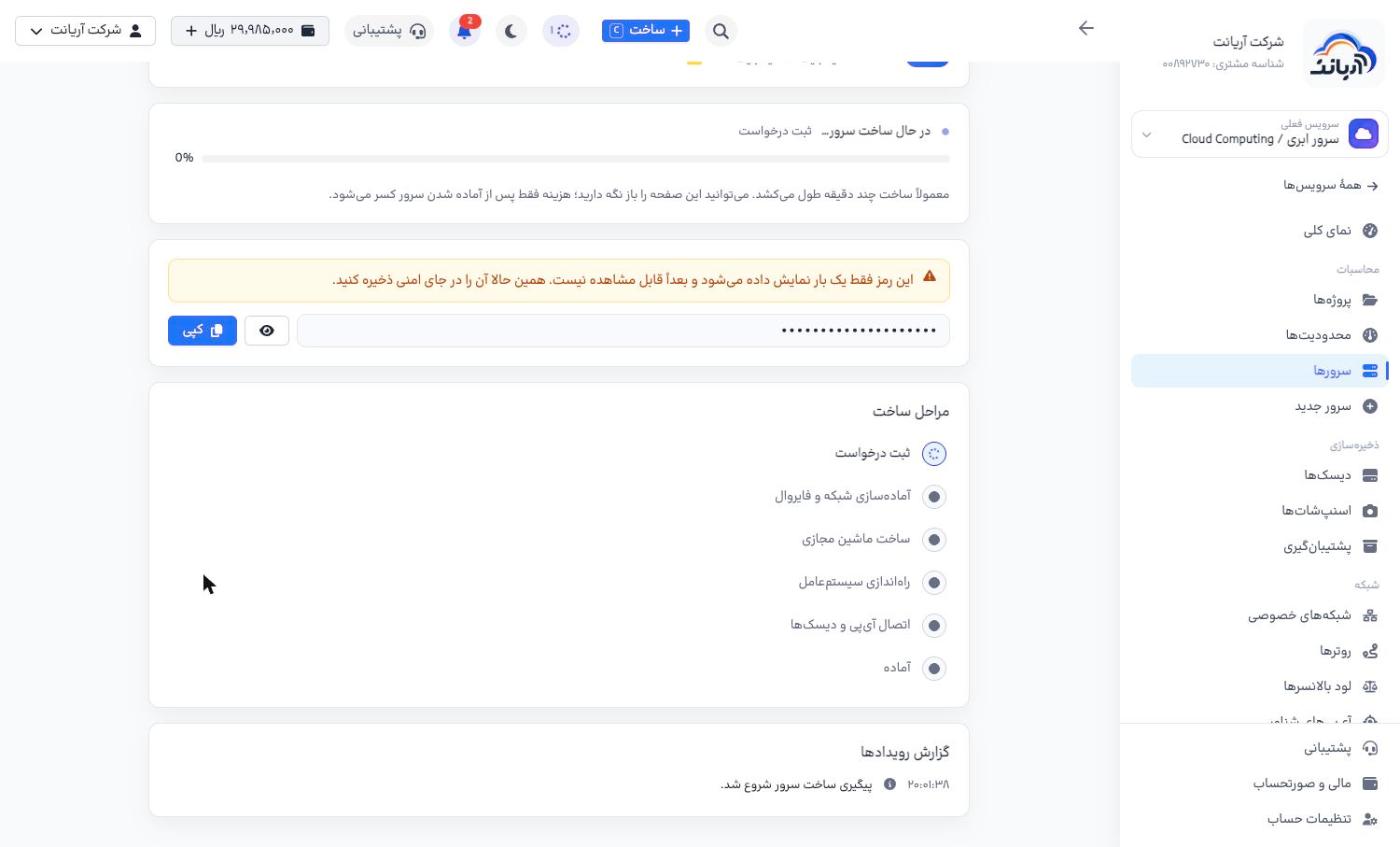
If a root password was generated, it is shown only once, on this page, and cannot be viewed later. Reveal it with the eye button and save it somewhere safe right away with Copy («کپی»).
When the message Server created successfully («سرور با موفقیت ساخته شد») appears, click Manage server («مدیریت سرور»).
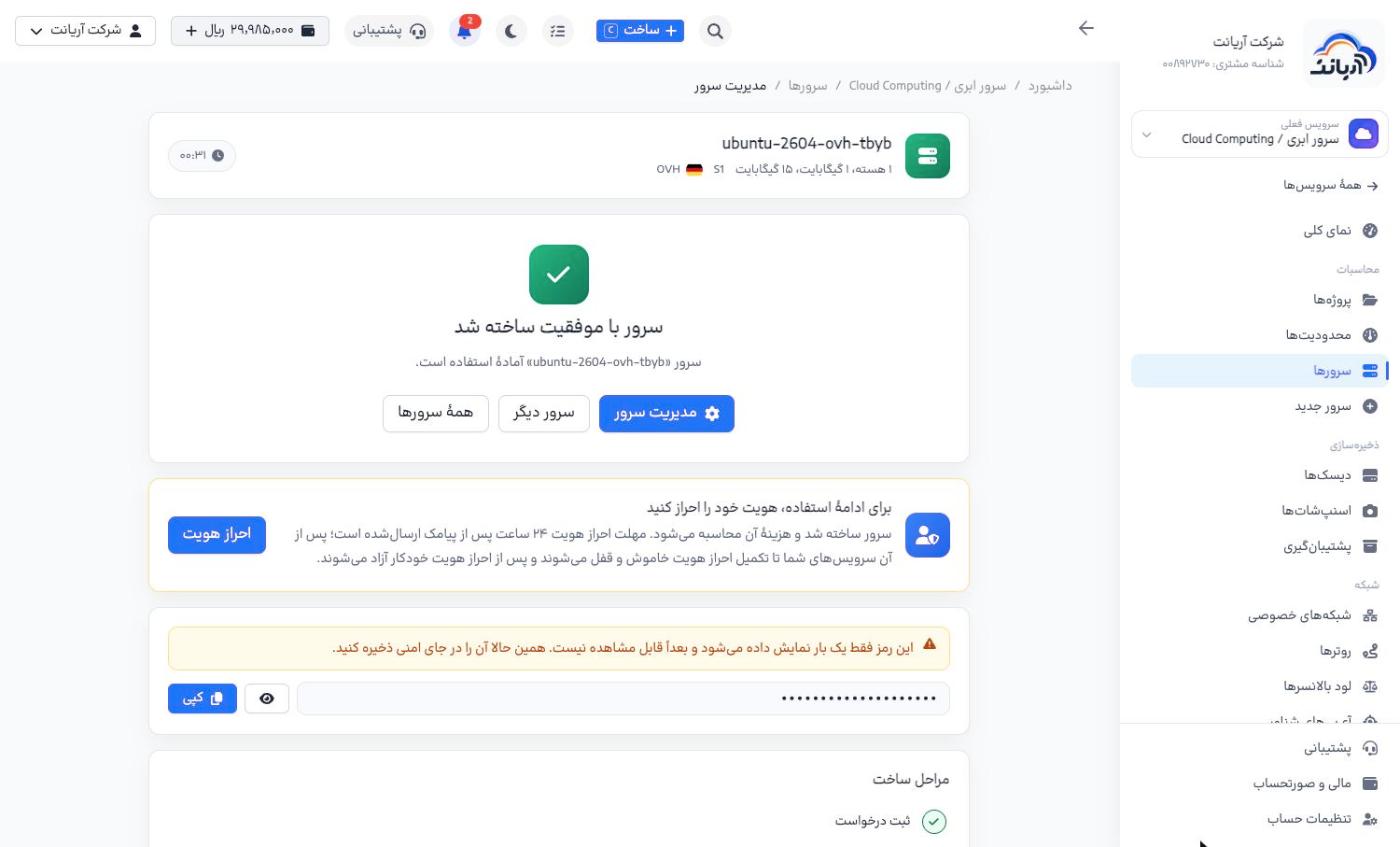
If you have not verified your identity, you receive an SMS reminder after creating your first server and have 24 hours. After that, your services are turned off and locked until verification is complete, and they are released automatically once you are verified.
The server page
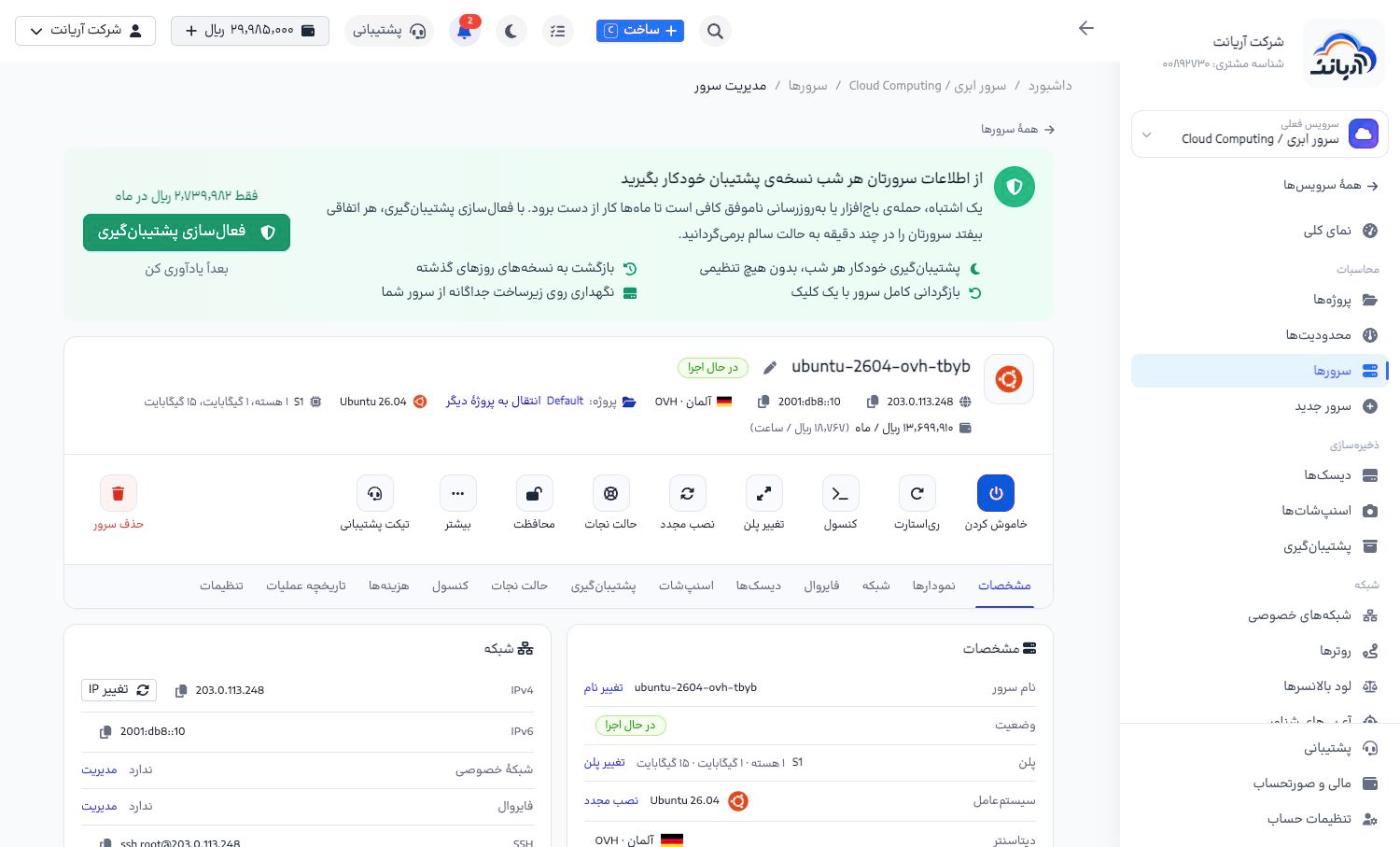
The top of the page shows the server's name and status, IPv4 and IPv6 (with copy buttons), region, project (Move to another project, «انتقال به پروژهٔ دیگر»), operating system, plan, and monthly and hourly cost. Action buttons: power off, restart, console, change plan, reinstall, rescue mode, protection, more, support ticket and delete server.
| Tab | What it does |
|---|---|
| Details («مشخصات») | name, status, plan, operating system, data center, network and a ready-made SSH command |
| Graphs («نمودارها») | CPU, network and disk usage |
| Networking («شبکه») | public IPs, IP change, reverse DNS |
| Firewall («فایروال») | attached firewalls |
| Volumes («دیسکها») | create and attach separate volumes |
| Snapshots («اسنپشات») | take and restore snapshots |
| Backups («پشتیبانگیری») | daily automatic backups |
| Rescue mode («حالت نجات») | boot into a temporary system for repairs |
| Console («کنسول») | the server's screen in your browser |
| Costs («هزینهها») | the hourly and monthly cost of each part |
| Action history («تاریخچه عملیات») | every action taken |
| Settings («تنظیمات») | name, labels, protection, root password reset |
Networking and reverse DNS
The Networking («شبکه») tab shows the server's public addresses with the type, subnet, gateway and reverse DNS of each. Change the IPv4 address with Change IP («تغییر IP»).
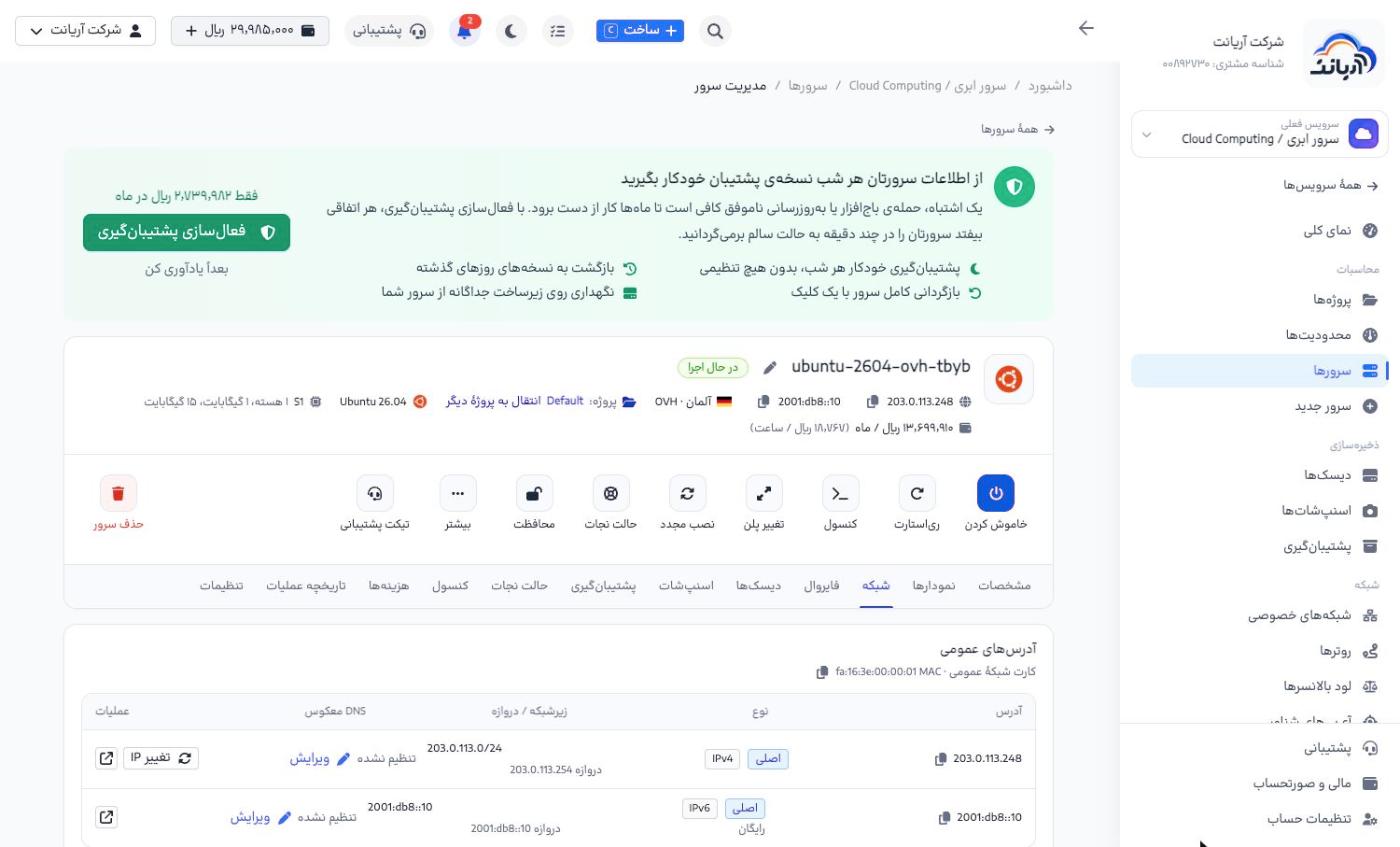
To set reverse DNS (PTR), click Edit («ویرایش») next to the IP, enter a domain name (for example mail.example.com) and click Save («ذخیره»).
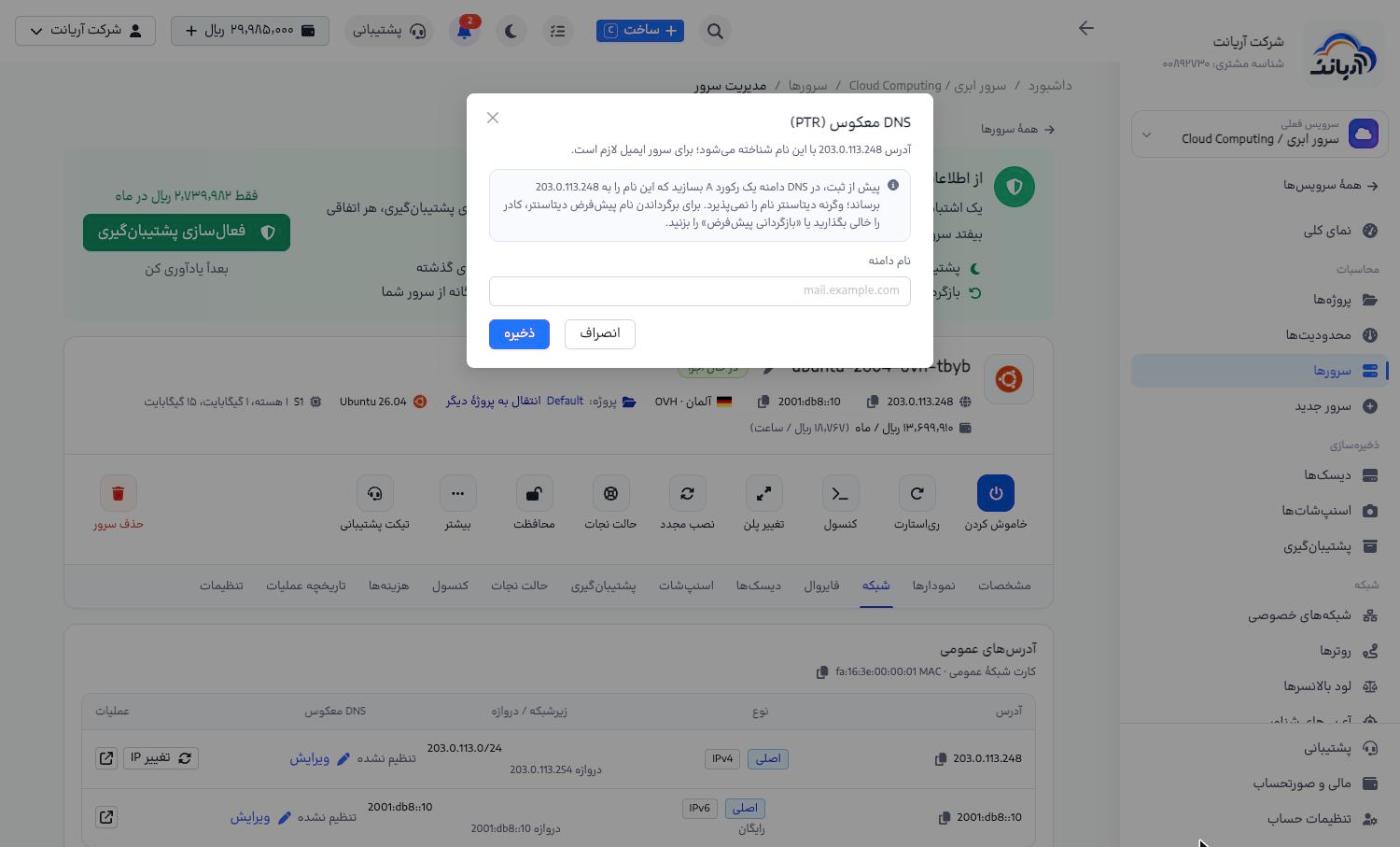
Before saving, create an A record in the domain's DNS that points this name to this IP; otherwise the data center will not accept the name. To restore the data center's default name, leave the box empty. Reverse DNS is required for a mail server.
Snapshots
A snapshot is a full copy of the server's main disk. Before important changes (updates, installing software), click Take snapshot («گرفتن اسنپشات») so that if something goes wrong you can roll the server back to that moment or create a new server from it.
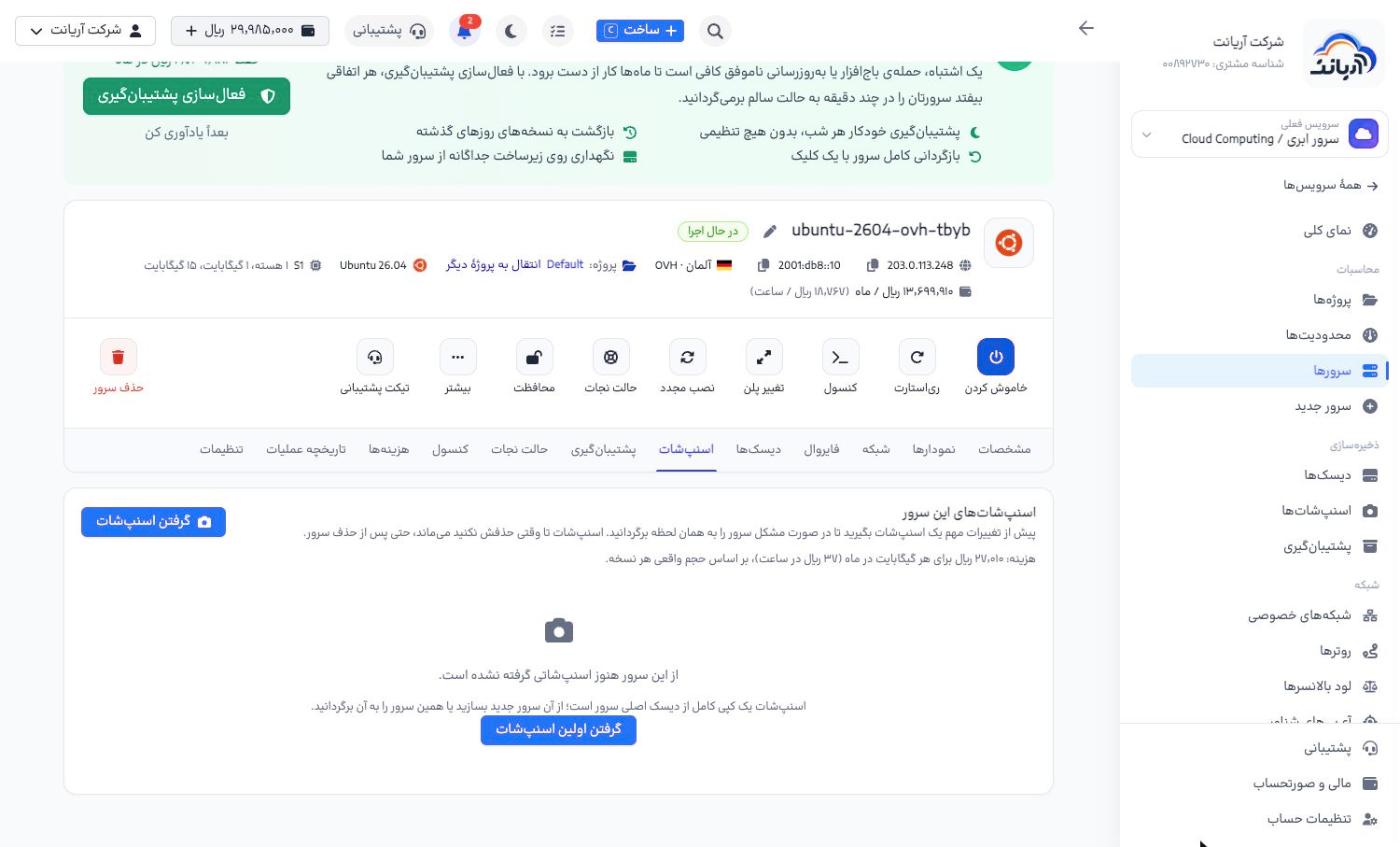
A snapshot stays until you delete it, even after the server is deleted, and is charged based on the actual size of each copy (the price per gigabyte per month is shown on this page). Delete old snapshots.
Costs
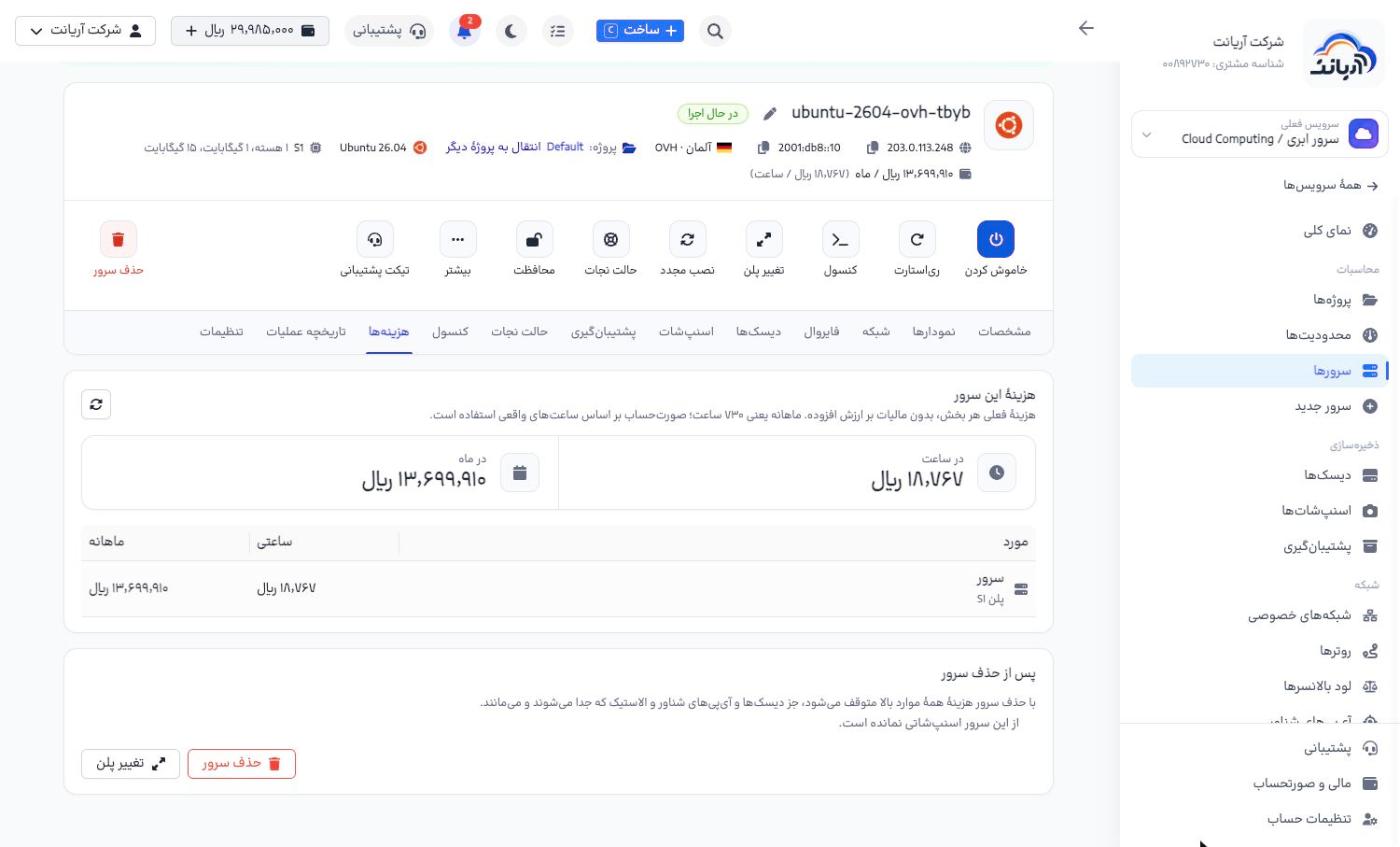
The Costs («هزینهها») tab shows the current cost of each part of the server, hourly and monthly (excluding VAT). Billing is based on the actual hours used.
Rescue mode, console, reinstall and change plan
- Rescue mode («حالت نجات»): the server boots into a temporary system so you can repair the main disk (for example after a forgotten password or a boot failure). Exit rescue mode when you are done.
- Console («کنسول»): the server's screen in your browser; for when SSH is not reachable.
- Reinstall («نصب مجدد»): a new operating system is installed and all data on the main disk is deleted.
- Change plan («تغییر پلن»): make the server bigger.
- Protection («محافظ»): prevents accidental deletion and reinstallation.
Deleting a cloud server
- Click Delete server («حذف سرور») (or the Delete server button in the Costs tab).
- Choose the reason for deletion and, if you like, add a note.
- Read the Will be deleted («پاک میشود») and Will remain («میماند») lists.
- Enter the exact server name and click Delete permanently («حذف برای همیشه»).
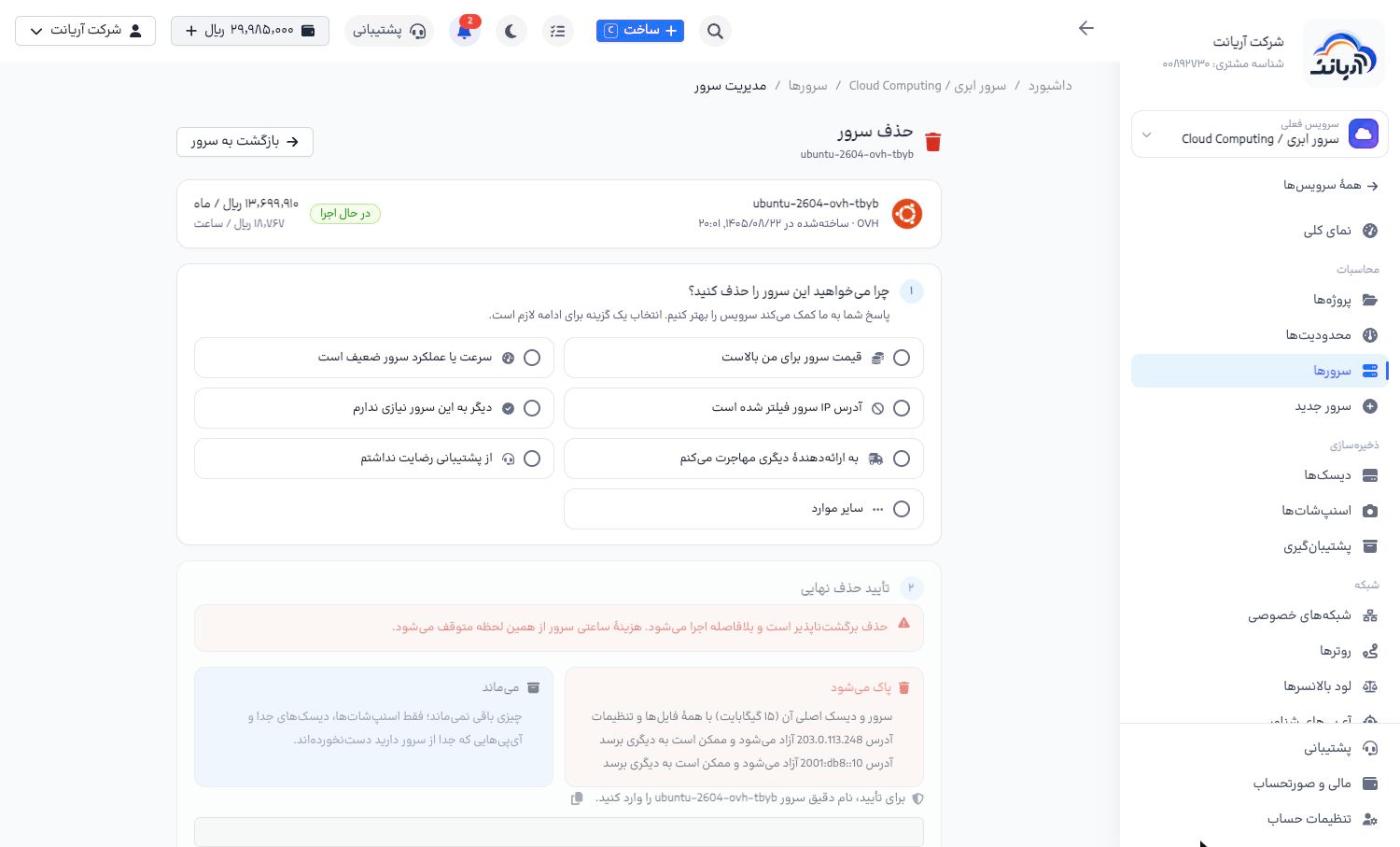
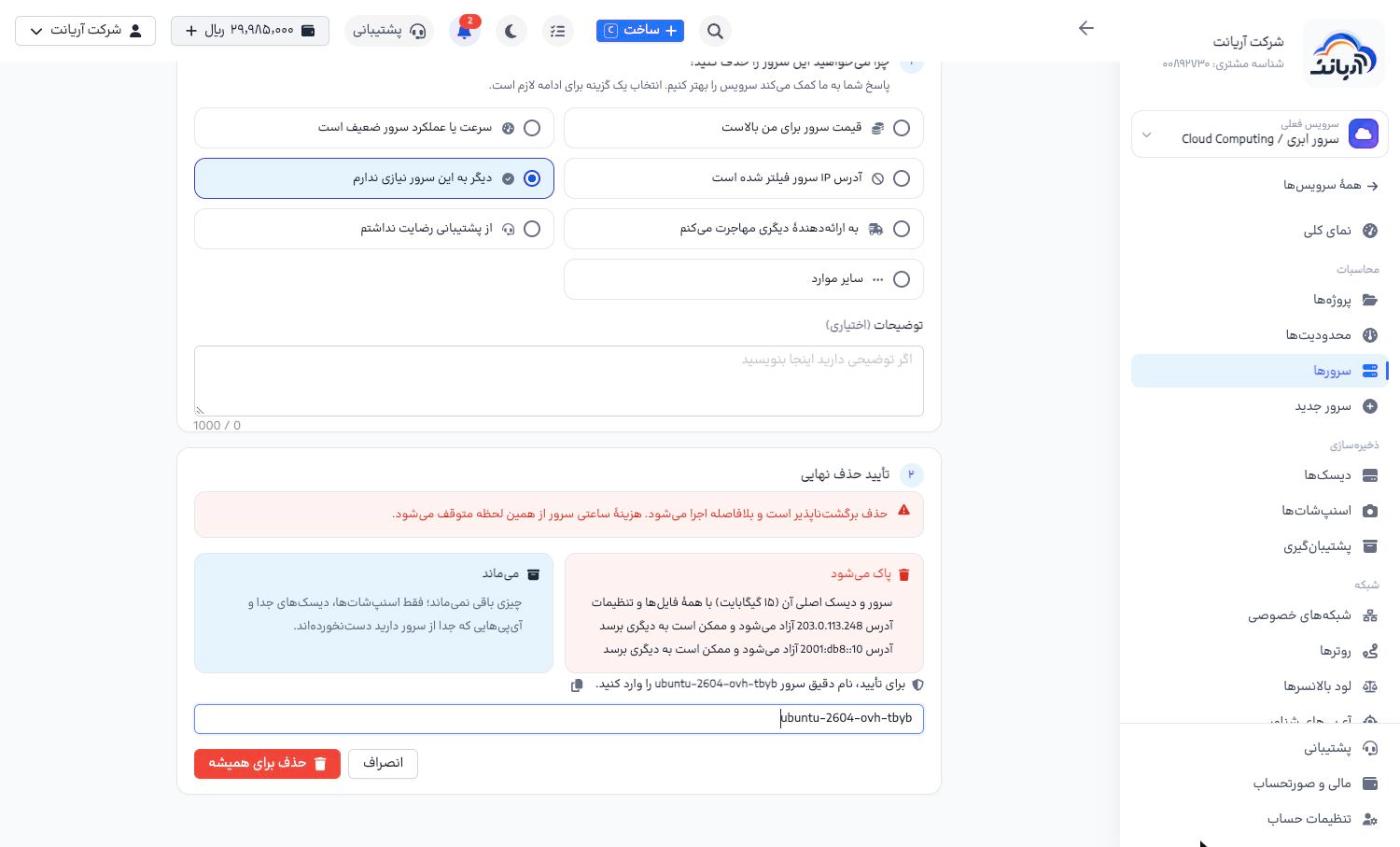
- Deletion is irreversible: the server and its main disk are deleted with all their files, and its IPs are released and may be assigned to someone else.
- The server's hourly cost stops immediately, but snapshots, separate volumes and floating and elastic IPs remain and keep being charged. If you don't need them, delete them separately from the cloud menu.
Other cloud resources
Each of these resources has its own page in the cloud menu: volumes, private networks, routers, floating and elastic IPs, firewalls, snapshots, backups, load balancers and projects. On each page, create a new resource with the create button, and delete it from that resource's page. Limits («محدودیتها») shows the maximum number of each resource in your account.